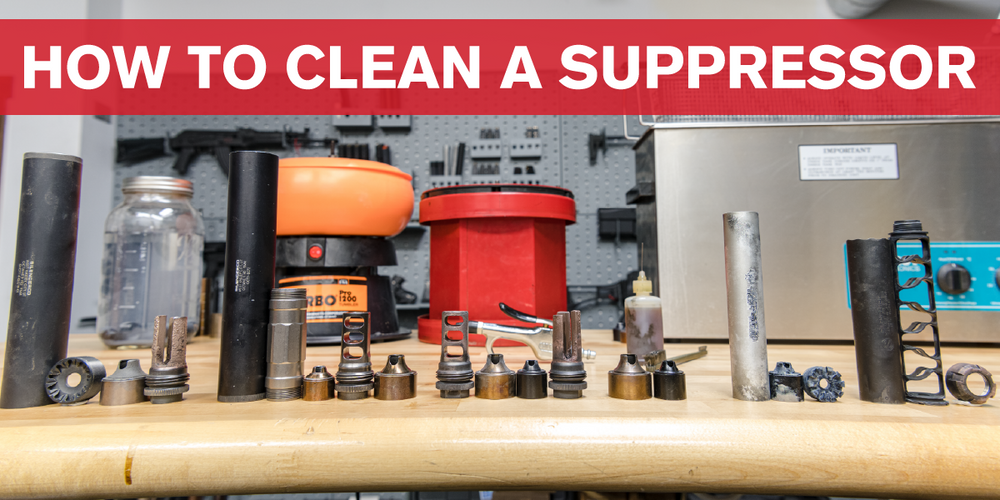
As a responsible gun owner, you’re probably looking for every piece of information to keep your gear clean and ready to run. In this article, we’ll be covering why suppressors get dirty, some of the most discussed cleaning methods, suppressor materials (and what techniques not to use on respective materials), and parts of a silencer to clean.
We’ve partnered up with SilencerCo to give an in-depth perspective on suppressor cleaning tactics, and we’re ready to report the facts about each method so that you don’t have to try them out yourself. By no means does this article cover every base regarding servicing a silencer, but we’ve attempted to provide the most common and beneficial options.
Disclaimer: before we get started, please note:
- Always ensure your host firearm is clear / unloaded before removing your silencer
- Due to the potential toxicity of certain aspects of cleaning a suppressor, take the necessary precautions (glove, goggles, etc.) during the process
- Always look to your manufacturer’s user manual for the proper way to disassemble your suppressor
Dirty Ammo and Dirty Suppressors
When it comes to cleaning a suppressor, there are several options at your disposal to reach the end goal: a high-performing, fully-functioning silencer. However, it’s important to avoid damaging the suppressor itself and its components (namely, destroying the serial number and making it illegal), which (unfortunately) is easily achieved when utilizing certain toxic chemicals and abrasive devices.
Unlike most high caliber suppressors (5.56mm, 7.62mm, and large bore), rimfire and pistol suppressors don’t have a self-cleaning capability which can make them quite dirty. So dirty, in fact, that it could impede on your suppressor’s performance.
Rimfire suppressors, specifically, are the main culprits in terms of dirtiness due to the unjacketed .22LR ammunition that is used. And although pistol suppressors generally use at least partially jacketed ammo, they are also prone to modest lead buildup, which directly affects your suppressor’s life expectancy, and how it performs.
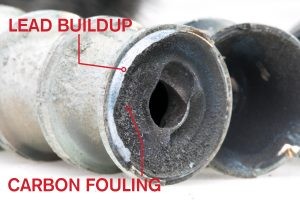
Generally, there are two culprits that accumulate within silencers: carbon and lead. You’ll be targeting these elements when cleaning your suppressor.
Carbon Fouling: As seasoned gun owners are all too familiar with, carbon is the byproduct of combustion in the chamber / barrel that accumulates as black residue pretty much everywhere. In the firearm industry, you may have heard it referred to as carbon fouling.
Lead Fouling: Lead, on the other hand, directly involves the projectiles that travel through the firearm’s barrel. As the projectiles make their way through the rifled barrel, minute grooves in the barrel “peel” off small slivers of lead and dispense them throughout the silencer’s interior. Not often found on the flat surfaces of silencers, this silvery, rigid buildup typically accrues within nooks and crannies.
How to Clean a Suppressor
As we discussed, there are different ways to get the same job done. We’ve categorized the most common suppressor cleaning techniques and most discussed below and teamed up with SilencerCo to give you the details on each method, including the good, the bad, and the ugly. You’ll find that we’ve included two taboo methods. While both of these are extremely uncommon, there are some myths around these techniques that we’d like to dispel.
Brush and Solvent - “The Elbow Grease Method”
A very effective way to clean a suppressor is to just use a good old fashioned brush and solvent. The great thing about using this technique is that it’s the most gentle option, and also the most cost effective. While it may take a little time to clean, you’ll be able to reach nooks and crannies effectively, without harming your suppressor.
In order to use this elbow grease method, you’ll need:
- A standard wire brush
- A pick (toothpick, punch, flat-head)
- A cloth
- A noncorrosive solvent (for example, diluted Simple Green, Hoppes #9, or soapy water)
Using the materials mentioned, disassemble your suppressor. Next, soak the tube and baffles in your solvent mixture for a few hours (some prefer overnight for maximum effectiveness). The next morning, brush / wipe away any leftover residue.
Wet Media Tumbler
Wet tumbling is another option for how to clean a suppressor. Wet tumbling uses a vibratory bowl cleaner with a noncorrosive solvent and metal media. This method is not as harmless as the elbow grease method, as it can wear on the tube finish, round thread pitch, and erode the intricacies of the suppressor parts over time, so use with caution.
A wet media tumbler uses:
- A rotary wet media tumbler
- A noncorrosive solvent (this is usually water and a small amount of dish detergent powder, dawn, or similar)
- About 5 pounds of metal media (little pieces of stainless steel)
Using the materials above, you’ll place the media, water, solvent mixture, then suppressor parts into your tumbler. Secure the tumbler with its locking mechanism, then turn it on and let it run for a few hours. Time is a relative component here; it will be dependent upon how dirty your silencer is. When you take the suppressor pieces out of the tumbler, be sure to check every potential spot metal media could be hiding. Media can get into threads or between baffle openings, for example. After it’s done, you’ll want to make sure you get all of the water off, so be sure to give it a good wipe down. As we mentioned earlier, wet tumbling is a little more aggressive, which can erode your suppressor’s components.
Soda Blaster
Soda blasters have been a solid go to for people looking for a more power-tool route that is less abrasive on suppressors. Soda blasting uses sodium bicarbonate and compressed air to literally blast away the lead and carbon fouling. We’ve seen a lot of DIY techniques here that raise a few eyebrows at the shop. Keep in mind that sodium bicarbonate, or similar media, is an abrasive. So, if it’s not being contained, it could damage or dirty nearby appliances.
In order to use the soda blaster, you will need:
- Compressor
- Soda blaster
- Sodium bicarbonate
- Blast box
- Recycling method (shop vac, or similar)
With the materials listed above, you’ll have a blaster and a blast shield. Use the soda blaster to blast away all of the lead and carbon fouling. Repeat until clean. Use a shop vac to flush airborne particulates in the interior of the blast box before opening it up.
Ultrasonic Cleaner
Ultrasonic cleaners are another suppressor cleaning option, and these use a high frequency vibration to essentially get the dirt and grime off of your silencer. They’re a popular option because they can clean a lot of parts in a timely manner.
In order to clean with an ultrasonic cleaner, you’ll need:
- Ultrasonic cleaner (with basket)
- Noncorrosive solvent (simple green or similar)
Remove the basket from the ultrasonic cleaner and place suppressor parts onto the basket. Pour simple green into the ultrasonic cleaner, then add the basket with the suppressor parts to the ultrasonic cleaner. Let it run for a few hours. Once done, your suppressor parts will have a filmy residue that you’ll need to towel off.
Dry Media Tumbler
Another method to clean your suppressor would be to use a tumbler with a dry media, hence, dry tumbling. The dry media used on suppressors is generally walnut media. When we tested this at SilencerCo, we found it to be completely ineffective.
Dry media tumblers use the following:
- A rotary dry tumbler
- A dry media (walnut or similar)
Using the materials above, you’ll place the dry media then the suppressor parts into your dry tumbler. Secure the tumbler, turn it on and let it run for a few hours. As we mentioned, we found this cleaning method to be ineffective. If you’ve had success cleaning a suppressor with a dry media tumbler, let us know in the comments what you used.
The Dip
This method can cause bodily harm, property damage, and even death.

The Dip is the most controversial suppressor cleaning method in this bunch. While it does work, the costs associated are too great to justify the reward. If you do decide to go down this route, which we do not support in any way, shape, or form, contact your local fire department for guidance on proper disposal before you begin. The dip is also extremely detrimental to the environment so DO NOT dispose of it on your own without proper guidance from authorities. We cannot emphasize this enough.
The dip method uses:
- Vinegar
- Hydrogen peroxide
- Vat (mason jar, or similar)
Because of its danger and toxicity, we won’t be providing directions for how to use the dip as we don’t believe there is a way to safely do this at home when there are better, easier, and less dangerous solutions.
Suppressor Materials
As a general rule, the suppressor’s build materials will dictate which cleaning methods can be used on your specific silencer. As you can see in the metals and cleaning methods chart below, stainless steel and titanium constructed silencers can handle harsher cleaning methods.
|
Metals and Cleaning Methods Chart |
|||
|
Aluminum |
Stainless Steel |
Titanium |
|
|
Brush and Solvent |
Yes |
Yes |
Yes |
|
Wet Media Tumbler |
No |
Yes |
Yes |
|
Soda Blaster |
Yes |
Yes |
Yes |
|
Dry Media Tumbler |
No |
Yes |
Yes |
|
The Dip |
No |
Yes |
Yes |
Now, let’s examine the three primary silencer build materials and their key cleaning points:
Aluminum: Do NOT use ultrasonic cleaners, harsh solvents, or steel brushes/picks. To avoid permanent damage, only use safe chemicals and brass or plastic utensils. As a general rule of thumb, aluminum suppressors, like the SilencerCo Warlock for example, need to be serviced carefully.
Stainless steel: Suppressors constructed of stainless steel are more durable when shooting and when cleaning. They can withstand more than their aluminum counterparts, but tread lightly when using certain chemicals due to the reaction created between the metal and the solvent. You wouldn’t want to damage or accidentally remove the coating on your SilencerCo Sparrow because of how you cleaned it.
Titanium: Titanium suppressors are known for their lightweight yet durable features, so it can be treated similarly to stainless steel in regard to cleaning methods. Because titanium suppressors can be costly, we always recommend to err on the side of caution to protect silencers like the SilencerCo Switchback.
If your suppressor is composed of more than one of the elements we’ve listed (for example, the SilencerCo Octane 9 and SilencerCo Octane 45 are constructed of Stainless Steel and Aluminum), we’d recommend utilizing the manufacturer’s manual and deferring to the element that is the most susceptible to damage.
Parts of a Silencer to Service
Now, let’s dissect the primary pieces of a suppressor and how to treat each respective part.
Monocore / baffles: Depending on your suppressor’s design, the innards of your silencer are either a monocore or baffle setup. As a general rule of thumb, the flatt the surfaces are, the easier they are to clean. The devil is in the details, and that’s the internal baffle structure that’s usually easy to see and hard to reach and clean. Utilizing the solvent / toothbrush method usually works just fine. If needed, use a toothpick for the nooks and crannies, paying special attention to the places where metal meets metal.

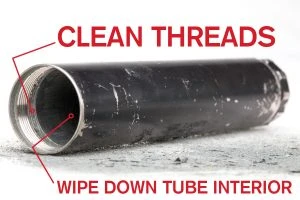
Tube / endcaps: Chalk these components up to being a breeze to maintain. Because monocore/baffle removal essentially cleans the tube internally, all that’s needed is a simple wipe down with a twist cloth to remove minimal debris. Use the same cloth to wipe down the endcaps.
Threads: Much like the tube / endcaps components, a quick wipe down – or pass through with a toothbrush - will suffice the threads. Using anything harsh might erode the precision, causing potential issues down the line.
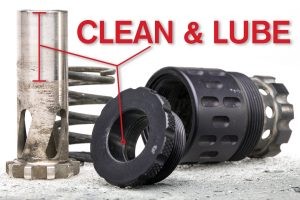
Boosters: Threaded handguns require the use of boosters, so these are parts that can experience some dirt. Merely remove the accompanying booster and wipe / lubricate as needed. It’s imperative that the interface between the piston and the housing is clean of debris and is also lubricated, otherwise the booster could malfunction.
O-rings: These lil’ guys are almost always located between the booster housing and the piston. A gentle clean and lube allow O-rings to function properly. Ultrasonic cleaners and other solvents degrade the O-ring material, so use caution when servicing (or avoid altogether).
Overview
This article is here to give you a starting point for your suppressor cleaning journey, but we always recommend referring to your silencer’s user manual for general care insight. Whenever in doubt, the guide provided by the manufacturer offers the best maintenance options for keeping your specific suppressor squeaky clean.
Regularly scheduled maintenance of your rimfire and pistol suppressors increases their performance and longevity. As always, contact us with any questions you might have regarding all-things silencers. Moreover, if you have personal triumphs / helpful tips regarding suppressor maintenance, please “Leave a Reply” below for your fellow suppressor enthusiasts. Cheers to clean and safe shooting.